Android 的安全性依賴於本身系統的設計, 主要的設計如下
* Sandbox 的設計, 讓App的資料與程式碼不為其他 App 所用
* Android 本身的架構設計就包含了 cryptography(加密), permissions, IPC (inter-process communication 進程間通訊).
* 還有些降低 memory 出錯的設計, 如: ASLR, NX, ProPolice....等
* 加密的檔案系統, 即使裝置遺失或被偷, 依然可以保護 data 免於被取出
* 使用者的 permission 設計, 讓使用者可以自行限制系統資源與使用者資料的讀取.
* 利用 App 設定的 permission 來控制 application 在每個 app 的基本資料.
藉由熟悉 Android 的 security 設計, 可以讓我們更容易地降低使用者的資安問題.
資料儲存 Storing Data
Android 的資料儲存分為三種:
使用內部儲存 Using internal storage
在預設的情況下, internal storage 的資料只能夠被自身的 App 讀取, 在大部分的情況下已然夠用.
要盡量避免使用 MODE_WORLD_WRITEABLE 或 MODE_WORLD_READABLE 來做 IPC 檔案, 因為這麼做的話, 所有的 App 都能讀到自身 App 的任何(格式)資料. 正確的做法是利用 content provider 來提供資料給某些你認同的 App.
要更謹慎處理的資料, 可以透過 KeyStore 來替該資料加密. 這個 Key 的密碼不直接存在裝置上, 如此便降低了遺失時的風險. 需要提防的是, 如果竊取者有 root 權限, 在輸入密碼的時候還是會被擷取到. (此舉應該是在認證還未過時, 更降低被破解的可能)
使用外部儲存 Using external storage
在 external storage (ex. SD卡) 上的資料, 通常可以被其他程式寫入並讀取. 因為外部儲存裝置可以被使用者取下, 所以最好不要存入任何重要資料.
因為 external storage 的資料可以被寫入, 我們使用前應該做 input validation 的測試. 最好不要將可執行的檔案放在 external storage, 而是應該透過伺服器作動態讀取. 如果真的要使用, 也應該加密並驗證.
使用 content providers
Content provider 是 Android 用來與其他 App 交流資料的機制. 如果設定permission 為 android:exported=false 則資料不會被其他 App 讀取到. 反之, 設 true 才能提供資料給其他 App.
透過 permission 可以控制其他 App 讀取或寫入的權限, 應該在一開始就設好, 畢竟之後修改的話可能就會影響到已使用的用戶.
如果 content provider 只有在自己開發的 Apps 用到, 可以設 android:protectionLevel="signature". 這樣 user 就不必認證, 可以有較佳的使用者體驗.
更細節一些, 可以提供 android:grantUriPermissions 的 permission, 這樣就可以進一步限制 permission 的路徑.
一但使用了 content provider, 最好也使用 query(), update(), delete() 這些帶有參數的方法, 可以避免一些不必要的 SQL 輸入錯誤.
要注意的是只提供 write 的 permission 並不表示竊資者無法讀取資料, 因為他們依然可以修改 WHERE 的參數來取得資料. 因此, 有了 write 的權限, 對竊取者來說也有了 read 的權限.
用戶的 Permissions
因為 Android 不同的 Apps 之間權限是相隔開的, 必須透過 permission 才能取得彼此的資源. 包括相機, 網路...等等.
要求 Permissions
原則上如果能不需要這個 permission, 那就不要去要求 permission.
Permission 要求的越少, 越不容易有資料外洩的問題.
創造 Permission
也可以要求 Android 系統預設之外的 permission,
有分 "signature" protection level 跟 "dangerous" protection level.
"dangerous" protection level 不為使用者接受的可能性較高些.
網路的使用 Using Networking
網路傳輸相對上比較危險一些, 可能會泄漏使用者的個資, 因此要小心處理.
網路 IP 的使用
盡量使用 HTTPS 的伺服器而非 HTTP, 因為行動裝置連上的網路通常沒有安全防護, 例如 wifi 熱點.
如果是使用 Socket 通訊, 可以使用 SSLSocket 這個 class. 建議整個通訊的內容都要特別加密.
在 IPC 的使用上, 必須使用 Android IPC mechanism; 不要使用 localhost, 因為這個界面可能會被其他任何的 App 所觀察到. (INADDR_ANY 也不能用, 因為自身的 App 會收到來自任何地方的 request)
此外, 也不要相信其它 Http 或不安全協定下載的檔案.
電話網路的使用 Using Telephony Networking
SMS (簡訊) 是設計給用戶間通訊用的, 不適合檔案傳輸. 建議使用 Google Cloud Messaging (GCM) 以及 IP 網路來傳遞檔案.
SMS 沒有經過特別的加密, 任何 SMS 的接收器都可能會收到惡意的 SMS. 因此不要信任這些 SMS. 當手機收到 SMS 時, 會發送 braoadcast intents, 因此任何有 READ_SMS permission 的 App 都可以接收到.
使用輸入驗證 Performing Input Validation
不正確的輸入驗證, 可能會導致 App 無法順利執行. 建議使用Android 系統提供的驗證.
如果是開發者使用自己的程式碼, 可能產生如 buffer overflow, use after free, 和 off-by-one errors 等問題. Android 有提供 ASLR(Address Space Layout Randomization) 以及 DEP(Data Execution Prevention) 來協助處理. (但最根本的 pointers 跟 buffer 還是要自己處理.)
動態上, JavaScript 跟 SQL 都有可能被 script injection (腳本攻擊, 因為 JavaScript 跟 SQL 都是 Script Language)
要減小 SQL injection 的方式是使用 content providers 提供的接口, 以及設置 permission.
雖然 blacklisting 也是一種方法, 但是不建議. ( blacklisting 只能預想切取者如何攻擊)
使用者的個資處理 Handling User Data
原則上, 越少索取 User data 就會越安全一些. 如果你取得了 User 資料可以不儲存, 也可以不傳遞, 那就不要. 如果把 email 當作是 hash 的 (primary) key, 就能減少所有資料被竊的可能.
如果開發者的應用儲存的使用者的名稱與密碼, 記得要對個資的使用作聲明. 避免有法律上的問題.
另外, 要減少暴露個資給第三方 App 的機會, 最好的方式就是減少個資讀取.
如果個資能不上傳到網站, 則盡量別上傳, 在本機端處理就好.
謹慎處理 IPC 的資料, 確認個資不會外洩.
如果需要長串的辨識碼(GUID), 不要使用手機號碼 或 IMEI .
Log 的寫入也要小心, 因為其他 App 也看得到 Log 的資料.
使用 WebView
WebView 的資料是由 HTML 與 JavaScript 所構成, 不當使用就會有 cross-site-scripting (JavaScript injection) 的問題.
如果, 你的應用沒有使用到 JavaScript, 則不要設 setJavaScriptEnabled(). (預設是沒有開啟)
使用 addJavaScriptInterface() 也是一樣必須小心, 只連上值得信任的網站是比較安全的. 最好是只有當 App 的 APK 本身有使用到 JavaScript 才開啓這項.
另外, 使用 clearCache() 可以刪除本機端的 Cache; 伺服器端如果 header 有 no-cache 則可避免資料存在手機端.
憑證處理 Handling Credentials
要避免資料外洩, 就要減少憑證要求, 也不要將個資存於手機, 尤其是賬號密碼.
比較好的方式是, 使用者透過賬號密碼取得 token; token 的生存時間短, 減少被竊的危險.
如果開發者的服務 (Service) 可以被很多 Apps 使用, 則使用 AccountManager 這個 class, 並且不用將密碼存於裝置上是比較好的. 此外, 也要注意 AccountManager 取回的 Account 別傳給錯誤的 App.
如果某個憑證(Credential) 只有開發者的 Apps 能用, 則可使用 checkSignature() 來達成 App 的認證. 相對的, 如果只有一個 App 會使用, 則可用 KeyStore 來儲存.
加密使用 Using Cryptography
網路的使用最好使用 HttpsURLConnection 或 SSLSoket.
如果要自行加密, 則有 Cipher 這個 class. 也有 SecureRandom, KeyGenerator 來產生加密代碼.
如果某個 Key 要重復用, 則可用 KeyStore 來加密儲存.
使用 IPC Using Interprocess Communication
Android 的 IPC 方式有 Intent, Binder 或 Messenger, 加上Service, BroadCastReceiver.
如果不需要被其他 App 使用, 則 android:exported 設為 "false".
如果只給開發者的 Apps 使用, 則 android:protectionLevel 設為 "signature".
Intent 使用, Using intent
Intent 有分 explicit 跟 implicit,
explicit intent 會直接呼叫開發者指定的 class,
implicit intent 會透過 intent filter 以及 permission 查看有哪些 class 可接收這個 intent.
所以傳遞重要資料時, 更要特別小心 permission 的設置.
Service 使用 Using Services
Service 預設不能為其他 App 所用, 但如果透過 intent filter 就可以截取 implicit intent.
使用 Binder 跟 Messenger Interfaces, Using binder and messenger interfaces
Binder 跟 Messenger 並不需要另設 permission, 它們的 permission 會延伸至 Service 或 Activity.
使用 Broadcast Receiver, Using broadcast receivers
BroadcastReceiver 預設可以接受任何的 intent, 但可以透過 permission 來限制只有特定的 intent 可以使用.
動態讀取程式碼, Dynamically Loading Code
不建議, 因為非常容易就會發生 code injection 的問題.
模擬器的安全性, Security in a Virtual Machine
模擬器有兩點需要注意:
* 模擬器的 Apps 之間沒有 sandboxes 隔開
* 使用時注意資料下載的來源, 避免惡意網路下載竊取資料.
Native Code 的安全性, Security in Native Code
不建議使用 Linux 原生語言, 可能會產生其他的問題. 如果真使用時, 也要瞭解 Linux 本身的安全性.
Android 的 Apps 之間有 sandboxes, 即使使用原生語言也是一樣. 可以想成是每個 App 自己有不同的 UID.
參考來源: http://developer.android.com/training/articles/security-tips.html
2013年10月23日 星期三
2013年10月21日 星期一
淺談 Saving Files
Android 使用檔案儲存的方式, 就像將檔案存在硬碟是一樣的, 主要會透過一個名為 File 的 API 來運作.
File 這個 API 適合用來寫入或讀取大量的資料而不間斷, 因此也常跟網路下載一起使用, 尤其是圖片.
選擇 Internal 或 External
儲存的位置可以分為 Internal 跟 External,
Internal 指的是內存, External 指的是 SD 卡.
如果檔案很大, 最好是存在 SD 卡上.
(通常預設 APP的 apk 檔是裝在 internal 裡, 如果檔案很大, 也可以設定裝在 SD 卡上)
下表是 Internal 跟 External 的比較

取得 External 的 Permission
要將檔案存至 SD 卡, 需要在 AndroidManifest.xml 取得 permission

將檔案存在 Internal
內部儲存的位置還分為兩個, 一個是 getFilesDir(), 一個是 getCacheDir().

Cache 是緩存(或稱暫存), 如果不想要 User 在短時間內不斷地 request 伺服器資料, 就可以先存在 Cache 裡. 但存在 Cache 裡的風險是, 一旦系統的資源不夠, 很可能就會把 Cache 理的資料清除掉, 所以使用上要小心.
如果要存在 internal 裡, 可以透過
 或者 (使用 openFileOutput(), FileOutputStream )

如果要使用 Cache, 則透過 createTempFile()

將檔案存在 External (SD卡)
可以透過 getExternalStorageState() 來知道是否裝置是否可存(例如, 是否有 SD 卡)

External 儲存可分為 public 跟 private,
public 可以被使用者的其他 App 查到, private 預設則是查不到.
兩個各有各的用法.

如果是 public file, 則取得儲存路徑要透過 getExternalStoragePublicDirectory(),

如果是 private file, 則取得儲存路徑要透過 getExternalFilesDir(),

其中的 Environment.DIRECTORY_PICTURES 是副檔名, 指定存放的位置, 好讓其他系統資源找到.
刪除檔案
刪除檔案可以透過
 或者
或者

當 App 刪除時, 會刪除所有 internal 以及 getExternalFilesDir() 的資料.
但 getChcheDir() 的並不會自動刪除 (可考慮手動刪除, 或讓系統自動刪除)
參考來源: http://developer.android.com/training/basics/data-storage/files.html
File 這個 API 適合用來寫入或讀取大量的資料而不間斷, 因此也常跟網路下載一起使用, 尤其是圖片.
選擇 Internal 或 External
儲存的位置可以分為 Internal 跟 External,
Internal 指的是內存, External 指的是 SD 卡.
如果檔案很大, 最好是存在 SD 卡上.
(通常預設 APP的 apk 檔是裝在 internal 裡, 如果檔案很大, 也可以設定裝在 SD 卡上)
下表是 Internal 跟 External 的比較

取得 External 的 Permission
要將檔案存至 SD 卡, 需要在 AndroidManifest.xml 取得 permission

將檔案存在 Internal
內部儲存的位置還分為兩個, 一個是 getFilesDir(), 一個是 getCacheDir().

Cache 是緩存(或稱暫存), 如果不想要 User 在短時間內不斷地 request 伺服器資料, 就可以先存在 Cache 裡. 但存在 Cache 裡的風險是, 一旦系統的資源不夠, 很可能就會把 Cache 理的資料清除掉, 所以使用上要小心.
如果要存在 internal 裡, 可以透過


如果要使用 Cache, 則透過 createTempFile()

將檔案存在 External (SD卡)
可以透過 getExternalStorageState() 來知道是否裝置是否可存(例如, 是否有 SD 卡)

External 儲存可分為 public 跟 private,
public 可以被使用者的其他 App 查到, private 預設則是查不到.
兩個各有各的用法.

如果是 public file, 則取得儲存路徑要透過 getExternalStoragePublicDirectory(),

如果是 private file, 則取得儲存路徑要透過 getExternalFilesDir(),

其中的 Environment.DIRECTORY_PICTURES 是副檔名, 指定存放的位置, 好讓其他系統資源找到.
刪除檔案
刪除檔案可以透過

當 App 刪除時, 會刪除所有 internal 以及 getExternalFilesDir() 的資料.
但 getChcheDir() 的並不會自動刪除 (可考慮手動刪除, 或讓系統自動刪除)
參考來源: http://developer.android.com/training/basics/data-storage/files.html
2013年10月18日 星期五
準時收看 Youtube 頻道 ---- YoutubeFeeder
我平常會用 Feedly 收看一些網誌,


4. 新影片自動更新
登入後, 有訂閱的頻道一旦有新影片就會自動更新,
並且以推播(Notification)的方式通知使用者
(也可以設定為不通知)


前陣子, 在拍影片的時候突然想到,
何不做一個 Youtube 版的 Feedly?
這樣就能收到頻道的最新影片了!!
經過一個月斷斷續續地努力,
終於讓這款新的 App --- YoutubeFeeder 上架了.
也許有許多改進空間,
不過內心還是滿感動的.
現在都用它來看"中國好聲音", "最新電影預告片", "最新MV", "AndroidDeveloper"... 等
算是自家產品的忠實用戶 ^^~
讓我來介紹一下 App 的用法吧!
YoutubeFeeder 的App 用法
1. Youtube 登入
點選 Youtube 登入, 並選擇有訂閱 Youtube 頻道的帳號.
(訪客登入會有些預設的頻道, 但沒有自動更新功能)


2. 主頁(最新的影片)
登入後在主頁會出現最新的頻道影片,
影片看過後, 下次登入就不會再出現,
但可以滑動左側的欄位, 就會出現訂閱頻道的列表

(主頁, 新影片列表)

(拉動左側欄, 出現頻道列表)
3. 進入頻道列表
進入頻道列表後,
會出現該頻道的最新上傳影片, 最受歡迎影片, 以及影片播放清單.
就可以收看過往影片了!

4. 新影片自動更新
登入後, 有訂閱的頻道一旦有新影片就會自動更新,
並且以推播(Notification)的方式通知使用者
(也可以設定為不通知)


增加訂閱頻道
要增加訂閱頻道很簡單,
以中國好聲音為例.
1. 先進入Youtube, 並搜索"中國好聲音"

2. 將滑鼠移到頻道的名稱位置, 會彈出一個框框, 點擊紅色的訂閱扭

這樣就完成了訂閱,
以後就可以準時收看這個頻道下的各個影片!!
請大家支持囉!! ~~
2013年10月15日 星期二
訊息傳遞與過濾器 intents and Intent filters
Android 的四個主要元件為 Activity, Service, Broadcast Receiver, 以及 Content Provider,
其中, 前三個必須透過 intent 來喚醒.
Intent 是 Android 裡傳遞訊息的元件, 它依不同的方式來呼叫 Activity, Service, BroadCast Receiver.
* 在 Activity 裡, intent 可能會用於 Context.startActivity(), Activity.startActivityForResult() 來開始一個 Activity; 也可能會用於 Activity.setResult() 來回傳訊息.
* 在 Service 裡, intent 可能會用於 Context.startService() 來開始一個 Service, 或傳遞訊息給已經在運行中的 Service; 也可能用於 Context.bindService() 來建立呼叫元件與 Service 之間的關係.
* 在 Broadcast 裡, intent 用於各種 broadcast 的方法, 例如: Context.sendBroadcast(), Context.sendOrderBroadCast(), Context.sendStickyBroadcast() 都用來傳遞給有興趣的 Broadcast Receiver 接收
由於使用方法不同, intent 用於這三個元件間的訊息傳遞時, 並不會搞混.
再來我們詳細說明一下 intent 物件.
Intent 物件
Intent 是帶有訊息的包裹(集合), 這些訊息傳遞給有興趣的元件. (也就是 Activity, Service 或 Broadcast Receiver)
Intent 物件包含:
Component name
要接收 intent 的元件的名稱.
可以設定為 package + 元件名稱 (例如: "
com.example.project.app.FreneticActivity"),
如果元件位於 Application manifest 下的 package(例如: "
com.example.project"), 也可以直接設為元件名稱(例如: ".FreneticActivity" ),
如果有設 Component name, intent 會直接傳遞給名稱相符的元件. 如果沒設 Component name 則會透過其他方式來尋找適合接收此 intent 的元件.
Action
Action 是一個字串, 用來描述即將執行的動作. Intent 本身有定義一些 Aciton 如下:

另外, 我們也可以自定義 Action, 但要記得附上 package 路徑
( 例如: "
com.example.project.SHOW_COLOR")
我們所要執行的動作(action), 會決定如何給定 data 跟 extras (有點像 method 跟 argument 的關係), 所以 Action 最好是一個 specific 的命名.
Data
Data 是由 (Data 的) URI + (Data 的) MIME type 所組成的. 因應不同的 action, 就會使用不同的 data.
例如:
action 是 ACTION_EDIT, data 就應該含有要編輯的檔案的 URI (路徑).
action 是 ACTION_CALL, data 就應該含有 "tel:" + 電話號碼的 URI.
action 是 ACTION_VIEW, data 就應該含有 "http: " + 要顯示物件的 URI.
要判斷我們所指定的原件適不適合處理傳遞來的 intent, 可以利用 (MIME) type 來判斷. 例如用來顯示圖片的原件, 就不會被用來播放聲音.
在許多情況下, type 可以從 URI 來得知. 例如看到 "content: " + URIs 就可以知道 data 是由裝置的 content provider 所控制.
Category
Category 是 intent 的一項(附加)訊息, 說明怎樣的 component 可以處理這個 intent. 例如:

Extras
Extras 是一個可以帶有許多 key-value 訊息的元件.
這是個滿方便的元件, 在我們寫應用程式時很常使用到.
Flags
Flags 標誌常用來說明要如何執行一個 Activity (例如, 此 Activity 屬於哪個 task),
或者用來說明這個 Activity 在執行後要如何處理 (例如, 列入最近執行的 Activities 裡)
Intent 的解析
Intent 可以分為兩類:
* Explicit intents: 有明確元件目標(名稱)的 intent.
* Implicit intents: 沒有明確元件目標的 intent. (Implicit intent 通常用於啓動其他應用程式的元件)
Explicit intents 一定會呼叫特定元件名稱的元件. 而 Implicit intents 則要利用 Intent filters 來篩選出合適的元件.
篩選的考量有三個: action, data(包含 URI 跟 type), 以及 category.
Intent filters
Intent filters 寫於 AndroidManifest.xml 裡.
每一個 filter 會列出 action, data, 跟 category 的條件(不一定三個都要).
同時通過這些條件的 intent 才會被該元件接收. 但我們也可以多建立幾個 filters, 只要 intent 過得了某一個 filter 就行了.
Action 測試
Action 的 filter 例如:

每個 filter 至少要有一個 action, intent 只要過得了所列出的某個 action 即可.
如果沒有給定 intent 的 action, 則 intent 會通過任何 action的測試.
Category 測試
Category 的 filter 例如:

Intent 的 category 測試也是只要過得了一個即可. 但是由於 Implicit intent 會自動加上 "
android.intent.category.DEFAULT" 這個 category, 所以任一個想接收 Implicit intent 的元件基本上都要加上這個 category filter.
Data 測試
Data 的 filter 例如:

data 是由一個 URI 跟 一個 data type 組成.
URI 可以分解為由 scheme, host, port, path 所構成, 形式為:
scheme://host:port/path
例如:
content://com.example.project:200/folder/subfolder/etc
則 scheme 為 "content", host 為 "com.example.project", port 是 "200", path 是 "folder/subfolder/etc", 而 host + port 又稱為 authority.
每一項屬性都是可有可無的. 但並不全部都個別獨立. 例如有 authority 就要有 scheme; 有 path, 則要有 sheme 及 authority.
如果 filter 只有 scheme, 則任一 intent 有相同 scheme 的都可以通過測試.
如果 filter 設到了 path, 則 intent 要有部分相同的 path 才能通過測試.
Type 相較於 URI, 更常用於 filters. 如果有 "*" 字號, 表示任何 subtype 皆可通過測試.
例如: "text/*" or "audio/*"
Data 測試的規則是:
a. 沒有設 data (URI or Type) 的 intent 可以通過沒有設 data 的 filter
b. 有 URI 沒有 type 的 intent, 可以通過有設 URI 沒有設 type 的 filter, 例如: "mailto: ", "tel: " 就是這類.
c. 有 type 沒有 URI 的 intent, 可以通過有設 type 沒有設 URI 的 filter,
d. 有 URI 也有 type 的 intent, 在 type 的部分只要通過其中一個 type 測試即可.
在 URI 的部分, 除了 URI 吻合這個方式外, 由於 URI 默認支持 "content: " 以及 "file: ", 所以 filter 如果只設 type, URI 是 "content: " 以及 "file: " 則也是可以過的.
常用方式
1. data 只設 type. 因為 URI 默認支持 "content: " 以及 "file: ", 所以從 content provider 讀資料的話, 不去設 URI 是常用方式

2. 如果是 browser 在搜索可用的播放軟件, 可以這樣寫

3. 初始一個 Application, 並指定為開始元件.

Intent filter 的規則不少,
簡而言之, 如果希望外來的 Application 可以呼叫我們的 Application,
就必須寫 filter, 並且設置好 action, category, data 以避免判斷錯誤.
2013年10月14日 星期一
Android 的 pixel 與 dp
一直以來, 手機規格尺寸 pixel 與 dp (Density- Independent Pixels) 的問題,
就滿常出現在開發者之中的.
網路文章往往也一知半解, 即使知道了 pixel 與 dp 的轉換公式,
也不知公式如何得來?!
近日, Android Developer 上傳了一部影片, 比較詳細地說明了這些單位的前世今生!
我將其重點摘要如下:
DPI - dots per inch
Android 的螢幕解析度的好壞, 可以用 pixel density 來衡量. 而它的單位便是 dpi.
dpi 越高的的螢幕, 可以顯示的越精細, 看下圖便可瞭解.

因此, Google 為了簡化區分這些不同裝置螢幕解析度的好壞,
將其依 dpi 分成了四個不同的類別, 分別是: MDPI, HDPI, XHDPI, XXHDPI.

160 dpi 的裝置屬 MDPI, 240 dpi 即 HDPI, 320 dpi 是 XHDPI, 480 dpi 是 XXHDPI.
以 MDPI 為最基本的解析度, 其他三個都是其倍數.
Density Independent Pixels (dp or dip)
Density Independent Pixels 簡寫為 dp or dip, 是一個虛擬的解析度,
目的是為了讓我們更好量化手機上的視覺大小.
1 dp 在 160 dpi (MDPI) 的裝置上的長度等於 1 pixel.
1 dp 在 320 dpi (MDPI) 的裝置上的長度等於 2 pixel.
(如果是算大小, 記得要平方.)
以此類推, 因此有了這個公式:

相同的 dp 大小在不同的裝置上看起來, 基本上會是非常相近的.
而我們人的手指大小通常約 50 dp, 因此 button建議的大小是不小於 50dp 左右的長寬.
計算( 以 Nexus 7 為例 )
Nexus 7 是一個 7" 的 XDPI 裝置, 解析度為 1920 x 1200 px, 問長寬分別是多少 dp?
首先, XDPI 是 320 dpi,
接著套用公式,
長 1920/ (320/160) = 960 dp
寬 1200/ (320/160) = 600 dp
設計上的建議
瞭解了整個單位設計的原因, 影片的最後還給了兩點建議:
1. 視覺 Layout 的設計上以 dp 為單位
2. 依需要分別給 MDPI, HDPI, XHDPI, XXHDPI 不同大小的圖片.

2013年9月11日 星期三
單元四 隱藏的選單 --- DrawerNavigation
什麼是 DrawerNavigation ? 用 Youtube App 的一張圖來讓大家瞭解.

當你按左上方的 App icon 時, 或者是向左拖拉畫面時,
影藏於左側的選單會跑出來, 這便是所謂的 DrawerNavigation 了.
Android 在 android.supprot.v4 的 SDK 裡提供了 DrawerLayout 以及 ActionBarDrawerToggle,
使得 DrawerNavigation 的製作上有了比較標準的格式.
drawer_layout 畫面
在畫面實作上, 我們用 DrawerLayout 包住主畫面以及左側邊欄畫面,
左側邊欄畫面的 layout_gravity = "left", 這樣 DrawerLayout 就知道它是左側欄了!
drawer_layout.xml
DrawerLayoutActivity 主程式
在程式中調用 DrawerLayout, 須讓 drawer (左側欄) 的出現與 ActionBar 的顯示一致,
因此我們用 ActionBarDrawerToggle 讓 action bar 跟 DrawerLayout 連結在一起,
同時撰寫 DrawerListener 來處理 drawer 的狀態.
另外, 左側欄是一個 ListView, 依照 ListView 的模式處理即可.
DrawerLayoutActivity.class
範例圖片


當你按左上方的 App icon 時, 或者是向左拖拉畫面時,
影藏於左側的選單會跑出來, 這便是所謂的 DrawerNavigation 了.
Android 在 android.supprot.v4 的 SDK 裡提供了 DrawerLayout 以及 ActionBarDrawerToggle,
使得 DrawerNavigation 的製作上有了比較標準的格式.
drawer_layout 畫面
在畫面實作上, 我們用 DrawerLayout 包住主畫面以及左側邊欄畫面,
左側邊欄畫面的 layout_gravity = "left", 這樣 DrawerLayout 就知道它是左側欄了!
drawer_layout.xml
 <android.support.v4.widget.DrawerLayout
   xmlns:android="http://schemas.android.com/apk/res/android"
   android:id="@+id/drawer_layout"
   android:layout_width="match_parent"
   android:layout_height="match_parent">
   <ScrollView
     android:layout_width="match_parent"
     android:layout_height="match_parent"
     android:paddingLeft="16dp"
     android:paddingRight="16dp"
     android:scrollbarStyle="outsideOverlay">
     <TextView android:id="@+id/content_text"
          android:layout_width="match_parent"
          android:layout_height="match_parent"
          android:text="@string/drawer_layout_summary"
          android:textAppearance="?android:attr/textAppearanceMedium"/>
   </ScrollView>
   <ListView android:id="@+id/left_drawer"
        android:layout_width="200dp"
        android:layout_height="match_parent"
        android:layout_gravity="left"
        android:background="#ff333333"/>
 </android.support.v4.widget.DrawerLayout>
DrawerLayoutActivity 主程式
在程式中調用 DrawerLayout, 須讓 drawer (左側欄) 的出現與 ActionBar 的顯示一致,
因此我們用 ActionBarDrawerToggle 讓 action bar 跟 DrawerLayout 連結在一起,
同時撰寫 DrawerListener 來處理 drawer 的狀態.
另外, 左側欄是一個 ListView, 依照 ListView 的模式處理即可.
DrawerLayoutActivity.class
 @SuppressLint("NewApi")
 public class DrawerLayoutActivity extends Activity {
   private DrawerLayout mDrawerLayout;
   private ListView mDrawer;
   private TextView mContent;
   private ActionBarHelper mActionBar;
   private ActionBarDrawerToggle mDrawerToggle;
   @Override
   protected void onCreate(Bundle savedInstanceState) {
     super.onCreate(savedInstanceState);
     setContentView(R.layout.drawer_layout);
     mDrawerLayout = (DrawerLayout) findViewById(R.id.drawer_layout);
     mDrawer = (ListView) findViewById(R.id.left_drawer);
     mContent = (TextView) findViewById(R.id.content_text);
     mDrawerLayout.setDrawerListener(new DemoDrawerListener());
     mDrawerLayout.setDrawerShadow(R.drawable.drawer_shadow, GravityCompat.START);
     mDrawer.setAdapter(new ArrayAdapter<String>(this, android.R.layout.simple_list_item_1,
         Shakespeare.TITLES));
     mDrawer.setOnItemClickListener(new DrawerItemClickListener());
     mActionBar = createActionBarHelper();
     mActionBar.init();
     mDrawerToggle = new ActionBarDrawerToggle(this, mDrawerLayout,
         R.drawable.ic_drawer, R.string.drawer_open, R.string.drawer_close);
   }
   private class DrawerItemClickListener implements ListView.OnItemClickListener {
     @Override
     public void onItemClick(AdapterView<?> parent, View view, int position, long id) {
       mContent.setText(Shakespeare.DIALOGUE[position]);
       mActionBar.setTitle(Shakespeare.TITLES[position]);
       mDrawerLayout.closeDrawer(mDrawer);
     }
   }
   private class DemoDrawerListener implements DrawerLayout.DrawerListener {
     @Override
     public void onDrawerOpened(View drawerView) {
       mDrawerToggle.onDrawerOpened(drawerView);
       mActionBar.onDrawerOpened();
     }
     @Override
     public void onDrawerClosed(View drawerView) {
       mDrawerToggle.onDrawerClosed(drawerView);
       mActionBar.onDrawerClosed();
     }
     @Override
     public void onDrawerSlide(View drawerView, float slideOffset) {
       mDrawerToggle.onDrawerSlide(drawerView, slideOffset);
     }
     @Override
     public void onDrawerStateChanged(int newState) {
       mDrawerToggle.onDrawerStateChanged(newState);
     }
   }
   /**
    * Create a compatible helper that will manipulate the action bar if available.
    */
   private ActionBarHelper createActionBarHelper() {
     if (Build.VERSION.SDK_INT >= Build.VERSION_CODES.ICE_CREAM_SANDWICH) {
       return new ActionBarHelperICS();
     } else {
       return new ActionBarHelper();
     }
   }
   private class ActionBarHelper {
     public void init() {}
     public void onDrawerClosed() {}
     public void onDrawerOpened() {}
     public void setTitle(CharSequence title) {}
   }
   private class ActionBarHelperICS extends ActionBarHelper {
     private final ActionBar mActionBar;
     private CharSequence mDrawerTitle;
     private CharSequence mTitle;
     ActionBarHelperICS() {
       mActionBar = getActionBar();
     }
     @Override
     public void init() {
       mActionBar.setDisplayHomeAsUpEnabled(true);
       mActionBar.setHomeButtonEnabled(true);
       mTitle = mDrawerTitle = getTitle();
     }
     @Override
     public void onDrawerClosed() {
       super.onDrawerClosed();
       mActionBar.setTitle(mTitle);
     }
     @Override
     public void onDrawerOpened() {
       super.onDrawerOpened();
       mActionBar.setTitle(mDrawerTitle);
     }
     @Override
     public void setTitle(CharSequence title) {
       mTitle = title;
     }
   }
   @Override
   protected void onPostCreate(Bundle savedInstanceState) {
     super.onPostCreate(savedInstanceState);
     mDrawerToggle.syncState();
   }
   @Override
   public boolean onOptionsItemSelected(MenuItem item) {
     if (mDrawerToggle.onOptionsItemSelected(item)) {
       return true;
     }
     return super.onOptionsItemSelected(item);
   }
   @Override
   public void onConfigurationChanged(Configuration newConfig) {
     super.onConfigurationChanged(newConfig);
     mDrawerToggle.onConfigurationChanged(newConfig);
   }
 }
範例圖片

單元三 拖拉式的畫面轉換 --- ViewPager
在 Android 裡, 拖拉式換頁的元件稱作 ViewPager,
在許多文章式的 App 裡頭可以看到這樣的設計.
這種拖拉式的方式, 其實是利用 ViewPager 以及 Fragment 來達成的.
首先要寫個 adapter 繼承自 FragmentPagerAdapter,
然後再把 adapter 塞回給 ViewPager 的元件即可.
程式碼不多, 直接看 code.
MainActivity.class
 public class FragmentPagerSupport extends FragmentActivity {
   static final int NUM_ITEMS = 10;
   MyAdapter mAdapter;
   ViewPager mPager;
   @Override
   protected void onCreate(Bundle savedInstanceState) {
     super.onCreate(savedInstanceState);
     setContentView(R.layout.fragment_pager);
     mAdapter = new MyAdapter(getSupportFragmentManager());
     mPager = (ViewPager)findViewById(R.id.pager);
     mPager.setAdapter(mAdapter);
     Button button = (Button)findViewById(R.id.goto_first);
     button.setOnClickListener(new OnClickListener() {
       public void onClick(View v) {
         mPager.setCurrentItem(0);
       }
     });
     button = (Button)findViewById(R.id.goto_last);
     button.setOnClickListener(new OnClickListener() {
       public void onClick(View v) {
         mPager.setCurrentItem(NUM_ITEMS-1);
       }
     });
   }
   public static class MyAdapter extends FragmentPagerAdapter {
     public MyAdapter(FragmentManager fm) {
       super(fm);
     }
     @Override
     public int getCount() {
       return NUM_ITEMS;
     }
     @Override
     public Fragment getItem(int position) {
       return ArrayListFragment.newInstance(position);
     }
   }
 }
fragment_pager.xml
這裡範例除了設 ViewPager 外, 還多設了兩個按鈕以讓 Pager 可以快速跳到最前或最後.
範例圖片

P.S
ArrayListFragment.class 我們沒有實作, 大家開發時依據需要實作 Fragment 即可
 <LinearLayout xmlns:android="http://schemas.android.com/apk/res/android"
     android:orientation="vertical" android:padding="4dip"
     android:gravity="center_horizontal"
     android:layout_width="match_parent" android:layout_height="match_parent">
   <android.support.v4.view.ViewPager
       android:id="@+id/pager"
       android:layout_width="match_parent"
       android:layout_height="0px"
       android:layout_weight="1">
   </android.support.v4.view.ViewPager>
   <LinearLayout android:orientation="horizontal"
       android:gravity="center" android:measureWithLargestChild="true"
       android:layout_width="match_parent" android:layout_height="wrap_content"
       android:layout_weight="0">
     <Button android:id="@+id/goto_first"
       android:layout_width="wrap_content" android:layout_height="wrap_content"
       android:text="@string/first">
     </Button>
     <Button android:id="@+id/goto_last"
       android:layout_width="wrap_content" android:layout_height="wrap_content"
       android:text="@string/last">
     </Button>
   </LinearLayout>
 </LinearLayout>
這裡範例除了設 ViewPager 外, 還多設了兩個按鈕以讓 Pager 可以快速跳到最前或最後.
範例圖片

P.S
ArrayListFragment.class 我們沒有實作, 大家開發時依據需要實作 Fragment 即可
單元三 Fragment 的 Tab 應用 --- TabFragment
隨著 Fragment 的興起, TabActivity 這個物件已經不再維護了,
那我們要做類似 TabActivity 的畫面要如何做呢?
方式很簡單,
取得 FragmentTabHost, 再把 Fragment 塞入 Tab 中, 這樣就行了.
程式碼不多, 直接看 code 吧!
MainActivity.class
fragment_tabs.xml
這邊的 Fragments, 包刮:
CountingFragment.class, CursorLoaderListFragment.class, AppListFragment.class, ThrottleLoaderListFragment.class 我們沒有實作, 大家在開發上根據自己的需求實作即可.
範例圖片

那我們要做類似 TabActivity 的畫面要如何做呢?
方式很簡單,
取得 FragmentTabHost, 再把 Fragment 塞入 Tab 中, 這樣就行了.
程式碼不多, 直接看 code 吧!
MainActivity.class
 public class FragmentTabs extends FragmentActivity {
   private FragmentTabHost mTabHost;
   @Override
   protected void onCreate(Bundle savedInstanceState) {
     super.onCreate(savedInstanceState);
     setContentView(R.layout.fragment_tabs);
     mTabHost = (FragmentTabHost)findViewById(android.R.id.tabhost);
     mTabHost.setup(this, getSupportFragmentManager(), R.id.realtabcontent);
     mTabHost.addTab(mTabHost.newTabSpec("simple").setIndicator("Simple"),
         FragmentStackSupport.CountingFragment.class, null);
     mTabHost.addTab(mTabHost.newTabSpec("contacts").setIndicator("Contacts"),
         LoaderCursorSupport.CursorLoaderListFragment.class, null);
     mTabHost.addTab(mTabHost.newTabSpec("custom").setIndicator("Custom"),
         LoaderCustomSupport.AppListFragment.class, null);
     mTabHost.addTab(mTabHost.newTabSpec("throttle").setIndicator("Throttle"),
         LoaderThrottleSupport.ThrottledLoaderListFragment.class, null);
   }
 }
fragment_tabs.xml
 <android.support.v4.app.FragmentTabHost
   xmlns:android="http://schemas.android.com/apk/res/android"
   android:id="@android:id/tabhost"
   android:layout_width="match_parent"
   android:layout_height="match_parent">
   <LinearLayout
     android:orientation="vertical"
     android:layout_width="match_parent"
     android:layout_height="match_parent">
     <TabWidget
       android:id="@android:id/tabs"
       android:orientation="horizontal"
       android:layout_width="match_parent"
       android:layout_height="wrap_content"
       android:layout_weight="0"/>
     <FrameLayout
       android:id="@android:id/tabcontent"
       android:layout_width="0dp"
       android:layout_height="0dp"
       android:layout_weight="0"/>
     <FrameLayout
       android:id="@+id/realtabcontent"
       android:layout_width="match_parent"
       android:layout_height="0dp"
       android:layout_weight="1"/>
   </LinearLayout>
 </android.support.v4.app.FragmentTabHost>
這邊的 Fragments, 包刮:
CountingFragment.class, CursorLoaderListFragment.class, AppListFragment.class, ThrottleLoaderListFragment.class 我們沒有實作, 大家在開發上根據自己的需求實作即可.
範例圖片

單元三 模組化的UI畫面 --- Fragment
Fragment 可以用來顯示及執行 Activity 的某個需要的動作或畫面.
通常我們先將 Fragment 給模組化, 以方便在 Activity 裡添加.
換句話說, 我們可以用 Activity 來管控(數個) Fragment, 並藉此來決定 UI 畫面的顯示.
Framgent 的緣起
會有這樣的設計, 最早是因為須要處理不同尺寸螢幕的資料顯示, 例如: 平板.

平板的畫面比手機大得多, 因此我們希望可以將畫面切割成兩個部分, 讓左側 Fragment A 的點擊, 直接影響右側 Fragment B 的顯示.
而手機的部分, 因為畫面小, 只能將 Fragment A 與 Fragment B 分別使用不同的 Activity 來處理.
在沒有 Fragment 的情況下, 很可能必須為平板和手機分別寫不同的 Activity,
但有了 Fragment, 只需要做一個畫面就能在不同的 Activity 使用, 減少了重復寫 code 的可能性,
畫面模組化的好處在此時顯現了出來.
以至於在 Android 3.0 之後, Google 將許多元件都以 Fragment 來設計.
例如: Tab, ViewPager ... 等等.
Fragment 的 LifeCycle
Fragment 是依附 Activity 的模組畫面, 因此它的 LifeCycle 本身也與 Activity 息息相關.

看圖示可以知道, Fragment 跟 Activity 的 LifeCycle 很像.
當 Activity 添加 Fragment 時, 會先執行 onAttach(),
如果有預先儲存的 Bundle 資料, 應該在此載入.
在 onCreateView() 時, 要返回 Fragment 的 View.
接著, Framgent 的 onResume(), onStop(), onDestroy() 都是依附著 Activity 執行的. 也就是說,
當 Activity 處於畫面前端, 執行 onResume() 時, Framgent 就執行 onResume() ,
當 Activity 要結束了, 執行 onDestroy() 時, Fragment 就執行 onDestroy().
Fragment 的 LifeCycle 做得比 Activity 更細緻, 應是為了方便更細微的處理.
Fragment 的範例
這一次我們的範例取自 Android Developer 的 FragmentBasics,
用意就是做一個像我們最上面那個圖示一樣的 App,
在大尺寸的平板上, 左側是故事章節選擇的 ListView, 右側則是故事內容的 TextView,
平板畫面:
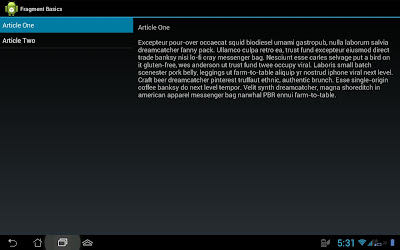
手機畫面:


Fragment 範例實作
1. 撰寫兩個同檔名 news_articles.xml 的 Layout
一個放在 res/layout 的資料夾, 一個放在 res/large-large 的資料夾. 放在 res/layout 資料夾下的即是提供手機使用, 在 res/layout-large 下的則提供平板使用
res/layout/news_articles.xml
res/layout-large/news_articles.xml
這裡可以注意到, 在大尺寸的畫面上, 我們塞了兩個 fragment, 並且用 layout_weight 分別派給了這兩個不同等分的大小. (HeadlinesFragment 佔 1/3, ArticleFragment 佔 2/3)
2. 分別撰寫 HeadlinesFragment 以及 ArticleFragment
HeadLinesFramgnet 跟 ArticleFragment 即是我們要用到的模組畫面, 可以注意到我們在大尺寸的畫面上已經悄悄用到這兩個 Fragment 了. 這種方法叫做靜態載入.
HeadlinesFragment.class
在 HeadlinesFragment.class, 我們寫了一個 onHeadlineSelectedListener 的 interface, 裡頭有 onArticleSelected() , 代表 implement 這個 onHeadlineSelectedListener 的 Activity 要實作 onArticleSelected(). 藉此, 便可以在 onAttach() 的時候取得這個 Listener 物件, 做為 Fragment 跟 Activity 溝通使用.
ArticleFragment.class
在ArticleFragment.class 的任務很簡單, 就是要把資料顯示在 article_view.xml 上.
3. 在 MainActivity 裡調用.
在MainActivity 裡, 我們必須大尺寸的雙畫面, 跟小尺寸的單畫面分別作不同的處置.
那要如何知道目前是大尺寸或小尺寸呢? 可以用有沒有 R.id.fragment_container 來判別.
(因為之前有說過, 裝置會自動調用 res/layout for 小尺寸, res/layout-large for 大尺寸)
如果有 R.id.fragment_container => 小尺寸, 沒有 R.id.fragment_container => 大尺寸.
MainActivity.class
同理, 如果 article_fragment 存在 => 大尺寸, 如果 article_fragment 不存在 => 小尺寸.
大尺寸當 HeadlinesFragment 被點擊時要 update ArticleFragment 的內容,
小尺寸當 HeadlinesFragment 被點擊時要產生新的 ArticleFragment, 並更新畫面.
原始碼連結
通常我們先將 Fragment 給模組化, 以方便在 Activity 裡添加.
換句話說, 我們可以用 Activity 來管控(數個) Fragment, 並藉此來決定 UI 畫面的顯示.
Framgent 的緣起
會有這樣的設計, 最早是因為須要處理不同尺寸螢幕的資料顯示, 例如: 平板.

平板的畫面比手機大得多, 因此我們希望可以將畫面切割成兩個部分, 讓左側 Fragment A 的點擊, 直接影響右側 Fragment B 的顯示.
而手機的部分, 因為畫面小, 只能將 Fragment A 與 Fragment B 分別使用不同的 Activity 來處理.
在沒有 Fragment 的情況下, 很可能必須為平板和手機分別寫不同的 Activity,
但有了 Fragment, 只需要做一個畫面就能在不同的 Activity 使用, 減少了重復寫 code 的可能性,
畫面模組化的好處在此時顯現了出來.
以至於在 Android 3.0 之後, Google 將許多元件都以 Fragment 來設計.
例如: Tab, ViewPager ... 等等.
Fragment 的 LifeCycle
Fragment 是依附 Activity 的模組畫面, 因此它的 LifeCycle 本身也與 Activity 息息相關.
看圖示可以知道, Fragment 跟 Activity 的 LifeCycle 很像.
當 Activity 添加 Fragment 時, 會先執行 onAttach(),
如果有預先儲存的 Bundle 資料, 應該在此載入.
在 onCreateView() 時, 要返回 Fragment 的 View.
接著, Framgent 的 onResume(), onStop(), onDestroy() 都是依附著 Activity 執行的. 也就是說,
當 Activity 處於畫面前端, 執行 onResume() 時, Framgent 就執行 onResume() ,
當 Activity 要結束了, 執行 onDestroy() 時, Fragment 就執行 onDestroy().
Fragment 的 LifeCycle 做得比 Activity 更細緻, 應是為了方便更細微的處理.
Fragment 的範例
這一次我們的範例取自 Android Developer 的 FragmentBasics,
用意就是做一個像我們最上面那個圖示一樣的 App,
在大尺寸的平板上, 左側是故事章節選擇的 ListView, 右側則是故事內容的 TextView,
平板畫面:

手機畫面:


Fragment 範例實作
1. 撰寫兩個同檔名 news_articles.xml 的 Layout
一個放在 res/layout 的資料夾, 一個放在 res/large-large 的資料夾. 放在 res/layout 資料夾下的即是提供手機使用, 在 res/layout-large 下的則提供平板使用
res/layout/news_articles.xml
 <FrameLayout xmlns:android="http://schemas.android.com/apk/res/android"
   android:id="@+id/fragment_container"
   android:layout_width="match_parent"
   android:layout_height="match_parent" />
res/layout-large/news_articles.xml
 <LinearLayout xmlns:android="http://schemas.android.com/apk/res/android"
   android:orientation="horizontal"
   android:layout_width="match_parent"
   android:layout_height="match_parent">
   <fragment android:name="com.example.android.fragments.HeadlinesFragment"
        android:id="@+id/headlines_fragment"
        android:layout_weight="1"
        android:layout_width="0dp"
        android:layout_height="match_parent" />
   <fragment android:name="com.example.android.fragments.ArticleFragment"
        android:id="@+id/article_fragment"
        android:layout_weight="2"
        android:layout_width="0dp"
        android:layout_height="match_parent" />
 </LinearLayout>
這裡可以注意到, 在大尺寸的畫面上, 我們塞了兩個 fragment, 並且用 layout_weight 分別派給了這兩個不同等分的大小. (HeadlinesFragment 佔 1/3, ArticleFragment 佔 2/3)
2. 分別撰寫 HeadlinesFragment 以及 ArticleFragment
HeadLinesFramgnet 跟 ArticleFragment 即是我們要用到的模組畫面, 可以注意到我們在大尺寸的畫面上已經悄悄用到這兩個 Fragment 了. 這種方法叫做靜態載入.
HeadlinesFragment.class
 public class HeadlinesFragment extends ListFragment {
   OnHeadlineSelectedListener mCallback;
   public interface OnHeadlineSelectedListener {
     public void onArticleSelected(int position);
   }
   @Override
   public void onCreate(Bundle savedInstanceState) {
     super.onCreate(savedInstanceState);
     int layout = Build.VERSION.SDK_INT >= Build.VERSION_CODES.HONEYCOMB ?
         android.R.layout.simple_list_item_activated_1 : android.R.layout.simple_list_item_1;
     setListAdapter(new ArrayAdapter<String>(getActivity(), layout, Ipsum.Headlines));
   }
   @Override
   public void onStart() {
     super.onStart();
     if (getFragmentManager().findFragmentById(R.id.article_fragment) != null) {
       getListView().setChoiceMode(ListView.CHOICE_MODE_SINGLE);
     }
   }
   @Override
   public void onAttach(Activity activity) {
     super.onAttach(activity);
     try {
       mCallback = (OnHeadlineSelectedListener) activity;
     } catch (ClassCastException e) {
       throw new ClassCastException(activity.toString()
           + " must implement OnHeadlineSelectedListener");
     }
   }
   @Override
   public void onListItemClick(ListView l, View v, int position, long id) {
     mCallback.onArticleSelected(position);
     getListView().setItemChecked(position, true);
   }
 }
在 HeadlinesFragment.class, 我們寫了一個 onHeadlineSelectedListener 的 interface, 裡頭有 onArticleSelected() , 代表 implement 這個 onHeadlineSelectedListener 的 Activity 要實作 onArticleSelected(). 藉此, 便可以在 onAttach() 的時候取得這個 Listener 物件, 做為 Fragment 跟 Activity 溝通使用.
ArticleFragment.class
 public class ArticleFragment extends Fragment {
   final static String ARG_POSITION = "position";
   int mCurrentPosition = -1;
   @Override
   public View onCreateView(LayoutInflater inflater, ViewGroup container,
     Bundle savedInstanceState) {
     if (savedInstanceState != null) {
       mCurrentPosition = savedInstanceState.getInt(ARG_POSITION);
     }
     return inflater.inflate(R.layout.article_view, container, false);
   }
   @Override
   public void onStart() {
     super.onStart();
     Bundle args = getArguments();
     if (args != null) {
       updateArticleView(args.getInt(ARG_POSITION));
     } else if (mCurrentPosition != -1) {
       updateArticleView(mCurrentPosition);
     }
   }
   public void updateArticleView(int position) {
     TextView article = (TextView) getActivity().findViewById(R.id.article);
     article.setText(Ipsum.Articles[position]);
     mCurrentPosition = position;
   }
   @Override
   public void onSaveInstanceState(Bundle outState) {
     super.onSaveInstanceState(outState);
     outState.putInt(ARG_POSITION, mCurrentPosition);
   }
 }
在ArticleFragment.class 的任務很簡單, 就是要把資料顯示在 article_view.xml 上.
3. 在 MainActivity 裡調用.
在MainActivity 裡, 我們必須大尺寸的雙畫面, 跟小尺寸的單畫面分別作不同的處置.
那要如何知道目前是大尺寸或小尺寸呢? 可以用有沒有 R.id.fragment_container 來判別.
(因為之前有說過, 裝置會自動調用 res/layout for 小尺寸, res/layout-large for 大尺寸)
如果有 R.id.fragment_container => 小尺寸, 沒有 R.id.fragment_container => 大尺寸.
MainActivity.class
 public class MainActivity extends FragmentActivity
     implements HeadlinesFragment.OnHeadlineSelectedListener {
   @Override
   public void onCreate(Bundle savedInstanceState) {
     super.onCreate(savedInstanceState);
     setContentView(R.layout.news_articles);
     if (findViewById(R.id.fragment_container) != null) {
       if (savedInstanceState != null) {
         return;
       }
       HeadlinesFragment firstFragment = new HeadlinesFragment();
       firstFragment.setArguments(getIntent().getExtras());
       getSupportFragmentManager().beginTransaction()
           .add(R.id.fragment_container, firstFragment).commit();
     }
   }
   public void onArticleSelected(int position) {
     ArticleFragment articleFrag = (ArticleFragment)
         getSupportFragmentManager().findFragmentById(R.id.article_fragment);
     if (articleFrag != null) {
       articleFrag.updateArticleView(position);
     } else {
       ArticleFragment newFragment = new ArticleFragment();
       Bundle args = new Bundle();
       args.putInt(ArticleFragment.ARG_POSITION, position);
       newFragment.setArguments(args);
       FragmentTransaction transaction = getSupportFragmentManager().beginTransaction();
       transaction.replace(R.id.fragment_container, newFragment);
       transaction.addToBackStack(null);
       transaction.commit();
     }
   }
 }
同理, 如果 article_fragment 存在 => 大尺寸, 如果 article_fragment 不存在 => 小尺寸.
大尺寸當 HeadlinesFragment 被點擊時要 update ArticleFragment 的內容,
小尺寸當 HeadlinesFragment 被點擊時要產生新的 ArticleFragment, 並更新畫面.
原始碼連結
2013年9月10日 星期二
單元一: 優化APP (Making APPs Beautiful)
關於要如何優化APP, Google 的工程師 Ankur Kotwal 做了一系列的 Youtube 教學影片,
我將其做點整理, 剛好可以拿來當做進階單元的一個開端.
這一系列影片共有五集, 從最初的 App 樣式一直修改至最後比較現代化的版本樣式( ActionBar, Theme, Fragment ... 等等), 也提供了支援 Android 2.3 之前的版本.
除此之外, 影片包含了許多 Google 建議我們的 Design Guide Line, 方便我們在 App 開發時, 更能遵從開發的一致性, 縮短開發設計時間, 十分值得好好學習.
Part 1. Modernize
在 Android 3.0 ( SDK version 10)之後, Google 加入了許多設計元素, 使得操作上更直覺, 畫面也更漂亮. 這段影片講解如何使用 ActionBar, 來使得 App 更有設計感, 同時也 ActionBar 的客制化連結.
Part 2. Spacing and Typography
以 ListView, DetailView 這兩個畫面的邊界設定和字型為例, 說明如何讓畫面看起來更有設計感.
Part 3. Tablets
平板跟手機不一樣的地方在於平板的畫面遠大於手機的畫面, 因此如果將手機畫面原原本本地搬到平板上, 顯然就不是那麼地實用. 因此, 利用 Fragment 將平板的畫面切割給不同的資料顯示, 以求使用者有更好地使用體驗.
Part 4. Performance Tuning
藉由使用 AsyncTask 以及 Cache 的方式來減低主線程不必要的工作量, 一來可以減低使用時卡卡的感覺, 二來可以縮短顯示時間.
Part 5 Backwards Compatibility and Modernization
Android 新舊版本要有更好地相容,
在 ActionBar 的部分可以使用 ActionBarCompact 或 ActionBarSherlock,
另外, 適當地使用 ViewPager, Fragment, Navigation Drawer ... 等,
都是很棒的方式.
原始碼連結
找到了 Ankur 在 GitHub 上提供的原始碼, 相信對大家在實作上會有所幫助.
2013年9月7日 星期六
單元二: 手機的資料儲存 --- SQLite + ContentProvider + Loader
在上一篇, 說明了 SQLite 直接調用的方法,
我們在這一篇裡, 想再說明另一種調用方式: SQLite + ContentProvider + Loader.
這種方式是透過 Loader 去調用 ContentProvider,
ContentProvider 再呼叫 SQLite 執行增刪改查的動作.

使用 Loader 有兩個好處,
一. 會異步更新資料 (Asynchronous Loading Data), 也就是不會佔到 Main Thread 的資源,
二. 可以監視 Data 的改變, 當 Data 改變時會通知 Main Thread.
在 Android Developer 的文件裡, 是建議我們使用 Loader 的.
SQLite + ContentProvider + Loader 的使用
使用上我們一樣分成幾個步驟:
1. 寫 ProductTable, 在這個 class 裡存放我們的資料檔名稱, 以及 provider 需要的路徑
2. 寫 ProductDBHelper ( 繼承自 SQLiteOpenHelper )
3. 寫 ProductProvider ( 繼承自 ContentProvider )
4. 在主程式裡調用
5. 在 AndroidManifest.xml 裡註冊 provider
我們的目標一樣是做上一篇的那張表, 並顯示在 ListView 上.
1. 寫 ProductTable
這個 ProductTable 繼承自 BaseColumns,
BaseColumns 包含了 _ID, _COUNT 兩個常數,
所以我們在設置常數的時候, 可以直接調用.
這裡我們要設置檔案的 Table 名稱, Table Column 的名稱,
以及 Provider 需要的 uri 路徑.
ProdcutTable.class
2. 寫 ProductDBHelper
ProductDBHelper 繼承自 SQLiteOpenHelper, 用來執行 SQLite 的指令.
ProductDBHelper.class
3. 寫 ProductProvider
我們透過 ProductProvider 來調用 ProductDBHelper,
這樣之後在主程式裡使用的時候, 就只需要管理 ProductProvider 這個接口就好.
ProductProvider.class
這裡用了一個技巧是使用 UriMatcher 透過路徑來分辨是要對 table 或者是 row 進行刪,查的動作, 也是挺實用的.
4. 在主程式裡調用
在 MainActivity 要使用 LoaderManager 必須繼承自 FragmentActivity,
並且 implements LoaderManager.LoaderCallbacks<Cursor>,
這樣就能有 Loader 的回呼函數: onCreateLoader(), onLoadFinished(), onLoaderReset().
實作上, 我們取得 ContentResolver (可以用來執行 ContentProvider 裡的方法),
接著存入幾筆資料, 再利用 Loader 讀回來.
MainActivity.class
5. 在 AndroidManifest.xml 裡註冊 provider
最後要在 AndroidManifest.xml 裡註冊 provider,
特別要注意 authority 的路徑要跟在 MainActivity.class 設的 AUTHORITY 一樣.
因為我們在 ProductTable.class 裡設的許多路徑, 也是跟著這個 AUTHORITY 設的.
必須要是這個路徑才能調用我們的 ProductProvider
AndroidManifest.xml
範例圖: (原始碼連結)

我們在這一篇裡, 想再說明另一種調用方式: SQLite + ContentProvider + Loader.
這種方式是透過 Loader 去調用 ContentProvider,
ContentProvider 再呼叫 SQLite 執行增刪改查的動作.
使用 Loader 有兩個好處,
一. 會異步更新資料 (Asynchronous Loading Data), 也就是不會佔到 Main Thread 的資源,
二. 可以監視 Data 的改變, 當 Data 改變時會通知 Main Thread.
在 Android Developer 的文件裡, 是建議我們使用 Loader 的.
SQLite + ContentProvider + Loader 的使用
使用上我們一樣分成幾個步驟:
1. 寫 ProductTable, 在這個 class 裡存放我們的資料檔名稱, 以及 provider 需要的路徑
2. 寫 ProductDBHelper ( 繼承自 SQLiteOpenHelper )
3. 寫 ProductProvider ( 繼承自 ContentProvider )
4. 在主程式裡調用
5. 在 AndroidManifest.xml 裡註冊 provider
我們的目標一樣是做上一篇的那張表, 並顯示在 ListView 上.
1. 寫 ProductTable
這個 ProductTable 繼承自 BaseColumns,
BaseColumns 包含了 _ID, _COUNT 兩個常數,
所以我們在設置常數的時候, 可以直接調用.
這裡我們要設置檔案的 Table 名稱, Table Column 的名稱,
以及 Provider 需要的 uri 路徑.
ProdcutTable.class
 public final class ProductTable implements BaseColumns {
   // This class cannot be instantiated
   private ProductTable() {}
   /**
    * The table name offered by this provider
    */
   public static final String TABLE_NAME = "product";
   /**
    * The content:// style URL for this table
    */
   public static final Uri CONTENT_URI = Uri.parse("content://" + MainActivity.AUTHORITY + "/"+TABLE_NAME);
   /**
    * The content URI base for a single row of data. Callers must
    * append a numeric row id to this Uri to retrieve a row
    */
   public static final Uri CONTENT_ID_URI_BASE
       = Uri.parse("content://" + MainActivity.AUTHORITY + "/"+TABLE_NAME+"/");
   /**
    * The MIME type of {@link #CONTENT_URI}.
    */
   public static final String CONTENT_TYPE
       = "vnd.android.cursor.dir/vnd.example.api-demos-throttle";
   /**
    * The MIME type of a {@link #CONTENT_URI} sub-directory of a single row.
    */
   public static final String CONTENT_ITEM_TYPE
       = "vnd.android.cursor.item/vnd.example.api-demos-throttle";
   /**
    * The default sort order for this table
    */
   public static final String DEFAULT_SORT_ORDER = _ID+" COLLATE LOCALIZED ASC";
   /**
    * Column name for the single column holding our data.
    * <P>Type: TEXT</P>
    */
   public static final String COLUMN_NAME_DATA = "product_name";
 }
2. 寫 ProductDBHelper
ProductDBHelper 繼承自 SQLiteOpenHelper, 用來執行 SQLite 的指令.
ProductDBHelper.class
 public class ProductDBHelper extends SQLiteOpenHelper {
   private static final String DATABASE_NAME = "productDB2.db";
   private static final int DATABASE_VERSION = 2;
   ProductDBHelper(Context context) {
     // calls the super constructor, requesting the default cursor factory.
     super(context, DATABASE_NAME, null, DATABASE_VERSION);
   }
   @Override
   public void onCreate(SQLiteDatabase db) {
     db.execSQL("CREATE TABLE " + ProductTable.TABLE_NAME + " ("
         + ProductTable._ID + " INTEGER PRIMARY KEY,"
         + ProductTable.COLUMN_NAME_DATA + " TEXT"
         + ");");
   }
   @Override
   public void onUpgrade(SQLiteDatabase db, int oldVersion, int newVersion) {
     // Kills the table and existing data
     db.execSQL("DROP TABLE IF EXISTS notes");
     // Recreates the database with a new version
     onCreate(db);
   }
 }
3. 寫 ProductProvider
我們透過 ProductProvider 來調用 ProductDBHelper,
這樣之後在主程式裡使用的時候, 就只需要管理 ProductProvider 這個接口就好.
ProductProvider.class
 public class ProductProvider extends ContentProvider {
   // A projection map used to select columns from the database
   private final HashMap<String, String> mNotesProjectionMap;
   // Uri matcher to decode incoming URIs.
   private final UriMatcher mUriMatcher;
   // The incoming URI matches the main table URI pattern
   private static final int MAIN = 1;
   // The incoming URI matches the main table row ID URI pattern
   private static final int MAIN_ID = 2;
   // Handle to a new DatabaseHelper.
   private ProductDBHelper mOpenHelper;
   /**
    * Global provider initialization.
    */
   public ProductProvider() {
     // Create and initialize URI matcher.
     mUriMatcher = new UriMatcher(UriMatcher.NO_MATCH);
     mUriMatcher.addURI(MainActivity.AUTHORITY, ProductTable.TABLE_NAME, MAIN);
     mUriMatcher.addURI(MainActivity.AUTHORITY, ProductTable.TABLE_NAME + "/#", MAIN_ID);
     // Create and initialize projection map for all columns. This is
     // simply an identity mapping.
     mNotesProjectionMap = new HashMap<String, String>();
     mNotesProjectionMap.put(ProductTable._ID, ProductTable._ID);
     mNotesProjectionMap.put(ProductTable.COLUMN_NAME_DATA, ProductTable.COLUMN_NAME_DATA);
   }
   /**
    * Perform provider creation.
    */
   @Override
   public boolean onCreate() {
     mOpenHelper = new ProductDBHelper(getContext());
     // Assumes that any failures will be reported by a thrown exception.
     return true;
   }
   /**
    * Handle incoming queries.
    */
   @Override
   public Cursor query(Uri uri, String[] projection, String selection,
       String[] selectionArgs, String sortOrder) {
     // Constructs a new query builder and sets its table name
     SQLiteQueryBuilder qb = new SQLiteQueryBuilder();
     qb.setTables(ProductTable.TABLE_NAME);
     switch (mUriMatcher.match(uri)) {
       case MAIN:
         // If the incoming URI is for main table.
         qb.setProjectionMap(mNotesProjectionMap);
         break;
       case MAIN_ID:
         // The incoming URI is for a single row.
         qb.setProjectionMap(mNotesProjectionMap);
         qb.appendWhere(ProductTable._ID + "=?");
         selectionArgs = DatabaseUtilsCompat.appendSelectionArgs(selectionArgs,
             new String[] { uri.getLastPathSegment() });
         break;
       default:
         throw new IllegalArgumentException("Unknown URI " + uri);
     }
     if (TextUtils.isEmpty(sortOrder)) {
       sortOrder = ProductTable.DEFAULT_SORT_ORDER;
     }
     SQLiteDatabase db = mOpenHelper.getReadableDatabase();
     Cursor c = qb.query(db, projection, selection, selectionArgs,
         null /* no group */, null /* no filter */, sortOrder);
     c.setNotificationUri(getContext().getContentResolver(), uri);
     return c;
   }
   /**
    * Return the MIME type for an known URI in the provider.
    */
   @Override
   public String getType(Uri uri) {
     switch (mUriMatcher.match(uri)) {
       case MAIN:
         return ProductTable.CONTENT_TYPE;
       case MAIN_ID:
         return ProductTable.CONTENT_ITEM_TYPE;
       default:
         throw new IllegalArgumentException("Unknown URI " + uri);
     }
   }
   /**
    * Handler inserting new data.
    */
   @Override
   public Uri insert(Uri uri, ContentValues initialValues) {
     if (mUriMatcher.match(uri) != MAIN) {
       // Can only insert into to main URI.
       throw new IllegalArgumentException("Unknown URI " + uri);
     }
     ContentValues values;
     if (initialValues != null) {
       values = new ContentValues(initialValues);
     } else {
       values = new ContentValues();
     }
     // 如果傳進來的 initialValues 是 null, 讓資料為 ""
     if (values.containsKey(ProductTable.COLUMN_NAME_DATA) == false) {
       values.put(ProductTable.COLUMN_NAME_DATA, "");
     }
     SQLiteDatabase db = mOpenHelper.getWritableDatabase();
     long rowId = db.insert(ProductTable.TABLE_NAME, null, values);
     // If the insert succeeded, the row ID exists.
     if (rowId > 0) {
       Uri noteUri = ContentUris.withAppendedId(ProductTable.CONTENT_ID_URI_BASE, rowId);
       getContext().getContentResolver().notifyChange(noteUri, null);
       return noteUri;
     }
     throw new SQLException("Failed to insert row into " + uri);
   }
   /**
    * Handle deleting data.
    */
   @Override
   public int delete(Uri uri, String where, String[] whereArgs) {
     SQLiteDatabase db = mOpenHelper.getWritableDatabase();
     String finalWhere;
     int count;
     switch (mUriMatcher.match(uri)) {
       case MAIN:
         // If URI is main table, delete uses incoming where clause and args.
         count = db.delete(ProductTable.TABLE_NAME, where, whereArgs);
         break;
         // If the incoming URI matches a single note ID, does the delete based on the
         // incoming data, but modifies the where clause to restrict it to the
         // particular note ID.
       case MAIN_ID:
         // If URI is for a particular row ID, delete is based on incoming
         // data but modified to restrict to the given ID.
         finalWhere = DatabaseUtilsCompat.concatenateWhere(
                   ProductTable._ID + " = " + ContentUris.parseId(uri), where);
         count = db.delete(ProductTable.TABLE_NAME, finalWhere, whereArgs);
         break;
       default:
         throw new IllegalArgumentException("Unknown URI " + uri);
     }
     getContext().getContentResolver().notifyChange(uri, null);
     return count;
   }
   /**
    * Handle updating data.
    */
   @Override
   public int update(Uri uri, ContentValues values, String where, String[] whereArgs) {
     SQLiteDatabase db = mOpenHelper.getWritableDatabase();
     int count;
     String finalWhere;
     switch (mUriMatcher.match(uri)) {
       case MAIN:
         // If URI is main table, update uses incoming where clause and args.
         count = db.update(ProductTable.TABLE_NAME, values, where, whereArgs);
         break;
       case MAIN_ID:
         // If URI is for a particular row ID, update is based on incoming
         // data but modified to restrict to the given ID.
         finalWhere = DatabaseUtilsCompat.concatenateWhere(
                   ProductTable._ID + " = " + ContentUris.parseId(uri), where);
         count = db.update(ProductTable.TABLE_NAME, values, finalWhere, whereArgs);
         break;
       default:
         throw new IllegalArgumentException("Unknown URI " + uri);
     }
     getContext().getContentResolver().notifyChange(uri, null);
     return count;
   }
 }
這裡用了一個技巧是使用 UriMatcher 透過路徑來分辨是要對 table 或者是 row 進行刪,查的動作, 也是挺實用的.
4. 在主程式裡調用
在 MainActivity 要使用 LoaderManager 必須繼承自 FragmentActivity,
並且 implements LoaderManager.LoaderCallbacks<Cursor>,
這樣就能有 Loader 的回呼函數: onCreateLoader(), onLoadFinished(), onLoaderReset().
實作上, 我們取得 ContentResolver (可以用來執行 ContentProvider 裡的方法),
接著存入幾筆資料, 再利用 Loader 讀回來.
MainActivity.class
 public class MainActivity extends FragmentActivity implements LoaderManager.LoaderCallbacks<Cursor>{
      /**
    * The authority we use to get to our sample provider.
    */
   public static final String AUTHORITY = "com.example.learnsqliteusingloader";
   private ListView mainList;
  // This is the Adapter being used to display the list's data.
   private SimpleCursorAdapter mAdapter;
      @SuppressLint("NewApi")
      @Override
      protected void onCreate(Bundle savedInstanceState) {
           super.onCreate(savedInstanceState);
           setContentView(R.layout.activity_main);
           mainList = (ListView) findViewById (R.id.main_list);
           // Create an empty adapter we will use to display the loaded data.
     mAdapter = new SimpleCursorAdapter(this,
         R.layout.item_list, null,
         new String[] { ProductTable.COLUMN_NAME_DATA },
         new int[] { R.id.text_list }, 0);
     mainList.setAdapter(mAdapter);
           // 寫入資料
     ContentResolver cr = getContentResolver();
     for (int i=0;i<11;i++){
          ContentValues values = new ContentValues();
          values.put(ProductTable.COLUMN_NAME_DATA, "cup_"+ Integer.toString(i));
          cr.insert(ProductTable.CONTENT_URI, values);
     }
     // Prepare the loader. Either re-connect with an existing one,
     // or start a new one.
     getSupportLoaderManager().initLoader(0, null, this);
      }
      @Override
      public boolean onCreateOptionsMenu(Menu menu) {
           // Inflate the menu; this adds items to the action bar if it is present.
           getMenuInflater().inflate(R.menu.main, menu);
           return true;
      }
      static final String[] PROJECTION = new String[] {
           ProductTable._ID,
           ProductTable.COLUMN_NAME_DATA,
   };
      @Override
      public Loader<Cursor> onCreateLoader(int arg0, Bundle arg1) {
           CursorLoader cl = new CursorLoader(this, ProductTable.CONTENT_URI,
         PROJECTION, null, null, null);
     return cl;
      }
      @Override
      public void onLoadFinished(Loader<Cursor> loader, Cursor data) {
           mAdapter.swapCursor(data);
      }
      @Override
      public void onLoaderReset(Loader<Cursor> loader) {
           mAdapter.swapCursor(null);
      }
 }
5. 在 AndroidManifest.xml 裡註冊 provider
最後要在 AndroidManifest.xml 裡註冊 provider,
特別要注意 authority 的路徑要跟在 MainActivity.class 設的 AUTHORITY 一樣.
因為我們在 ProductTable.class 裡設的許多路徑, 也是跟著這個 AUTHORITY 設的.
必須要是這個路徑才能調用我們的 ProductProvider
AndroidManifest.xml
 <provider android:name=".ProductProvider"
          android:authorities="com.example.learnsqliteusingloader" />
範例圖: (原始碼連結)

訂閱:
文章 (Atom)